SpringBoot源码分析之启动过程[1]
Spring Boot版本:2.1.8.RELEASE
Spring Boot启动过程是Spring Boot源码分析的第一章,其也是面试过程中Spring Boot方面考察较多的知识点之一。
从何入手
要分析Spring Boot的启动过程,需要从Spring Boot启动类的main函数入手:
@SpringBootApplication
public class SpringbootAnalyzeApplication {
    public static void main(String[] args) {
        SpringApplication.run(SpringbootAnalyzeApplication.class, args);
    }
}
通过Java方法使用SpringApplication类来引导和启动Spring应用程序。
通过SpringApplication.run(Class<?>[] primarySources, String[] args) new一个SpringApplication实例,并调用其run方法。
public static ConfigurableApplicationContext run(Class<?>[] primarySources, String[] args) {
    // step1:new SpringApplication
    // step2:springApplicaiton.run()
    return new SpringApplication(primarySources).run(args);
}
Step1:执行SpringApplication构造函数
SpringApplication构造函数主要执行以下步骤:
- 判断应用程序的类型
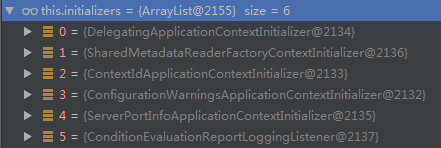
- 设置初始化器
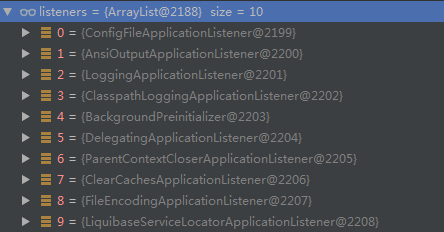
- 设置监听器
- 找到项目的主类
new关键字调用SpringApplication的构造函数如下:
public SpringApplication(ResourceLoader resourceLoader, Class<?>... primarySources) {
    // 要使用的资源加载器,在上面的main函数中并没有传,因此为null
    this.resourceLoader = resourceLoader;
    Assert.notNull(primarySources, "PrimarySources must not be null");
    // 主要的bean资源,其实就是在main函数中传进去的SpringbootAnalyzeApplication类,即项目启动类
    this.primarySources = new LinkedHashSet<>(Arrays.asList(primarySources));
    // 1.通过classpath中导入的jar包,判断应用程序的类型,有servlet/reactive/none类型
    // 当我们引入spring-boot-starter-web,就是servlet类型
    this.webApplicationType = WebApplicationType.deduceFromClasspath();
    // 2.读取spring.factories文件中要载入的初始化器,并实例化
    setInitializers((Collection) getSpringFactoriesInstances(ApplicationContextInitializer.class));
    // 3.读取spring.factories文件中要载入的监听器,并实例化
    setListeners((Collection) getSpringFactoriesInstances(ApplicationListener.class));
    // 4.找到项目的主类
    this.mainApplicationClass = deduceMainApplicationClass();
}
通过setInitializers和setListeners函数,Spring Boot从spring.factories文件中设置了如下实例:


Step2:执行SpringApplication类的实例方法run()
首先介绍run方法中使用的SpringApplicationRunListeners对象
SpringApplicationRunListeners类中包含一个SpringApplicationRunListener类型的链表,链表中存储了Spring Boot的SpringApplicationRunListener对象。
SpringApplicationRunListener是SpringApplication的run方法的监听器。
SpringApplicationRunListener用来发布SpringApplicationEventSpring应用程序事件。
所谓的发布事件其实就是调用事件对应的监听器的onApplicationEvent方法。
每个事件对应唯一一个监听器,使用for循环遍历所有监听器,从而找到对应事件的监听器。
EventPublishingRunListener是SpringApplicationRunListener唯一的实现类。
run方法的执行步骤和对应阶段发布的事件:
- 应用程序开始准备:ApplicationStartingEvent
- 环境配置:ApplicationEnvironmentPreparedEvent
- 创建容器
- 准备容器:ApplicationContextInitializedEvent和ApplicationPreparedEvent
- 刷新容器:ContextRefreshedEvent和ServletWebServerInitializedEvent
- 应用程序准备完成:ApplicationReadyEvent
context:应用程序容器
environment:应用程序环境
public ConfigurableApplicationContext run(String... args) {
    // 构造一个秒表,用作记录
    StopWatch stopWatch = new StopWatch();
    stopWatch.start();
    ConfigurableApplicationContext context = null;
    Collection<SpringBootExceptionReporter> exceptionReporters = new ArrayList<>();
    configureHeadlessProperty();
    // 创建SpringApplicationRunListeners对象
    SpringApplicationRunListeners listeners = getRunListeners(args);
    // 1.start:广播ApplicationStartingEvent事件
    listeners.starting();
    try {
        // main函数带的参数
        ApplicationArguments applicationArguments = new DefaultApplicationArguments(args);
        // 2.环境配置:广播ApplicationEnvironmentPreparedEvent事件
        ConfigurableEnvironment environment = prepareEnvironment(listeners, applicationArguments);
        configureIgnoreBeanInfo(environment);
        Banner printedBanner = printBanner(environment);
        // 3.根据程序的类型创建应用程序容器:servlet/reactive/none
        context = createApplicationContext();
        exceptionReporters = getSpringFactoriesInstances(SpringBootExceptionReporter.class,
                new Class[] { ConfigurableApplicationContext.class }, context);
        // 4.准备容器
        prepareContext(context, environment, listeners, applicationArguments, printedBanner);
        // 5.刷新容器
        // 发布ContextRefreshedEvent事件
        // 发布ServletWebServerInitializedEvent事件
        refreshContext(context);
        // 预留函数,方法体为空
        afterRefresh(context, applicationArguments);
        stopWatch.stop();
        if (this.logStartupInfo) {
            new StartupInfoLogger(this.mainApplicationClass).logStarted(getApplicationLog(), stopWatch);
        }
        listeners.started(context);
        callRunners(context, applicationArguments);
    }
    catch (Throwable ex) {
        handleRunFailure(context, ex, exceptionReporters, listeners);
        throw new IllegalStateException(ex);
    }
    try {
        // 6.running:发布ApplicationReadyEvent事件
        listeners.running(context);
    }
    catch (Throwable ex) {
        handleRunFailure(context, ex, exceptionReporters, null);
        throw new IllegalStateException(ex);
    }
    return context;
}
涉及的主要函数
prepareEnvironment:准备环境
private ConfigurableEnvironment prepareEnvironment(SpringApplicationRunListeners listeners,
        ApplicationArguments applicationArguments) {
    // Create and configure the environment
    // 直接得到环境或者根据应用程序的类型创建一个环境
    ConfigurableEnvironment environment = getOrCreateEnvironment();
    configureEnvironment(environment, applicationArguments.getSourceArgs());
    ConfigurationPropertySources.attach(environment);
    listeners.environmentPrepared(environment);
    bindToSpringApplication(environment);
    if (!this.isCustomEnvironment) {
        environment = new EnvironmentConverter(getClassLoader()).convertEnvironmentIfNecessary(environment,
                deduceEnvironmentClass());
    }
    ConfigurationPropertySources.attach(environment);
    return environment;
}
createApplicationContext:创建应用程序容器
protected ConfigurableApplicationContext createApplicationContext() {
    Class<?> contextClass = this.applicationContextClass;
    if (contextClass == null) {
        try {
            // 根据应用程序的类型选择不一样的容器
            switch (this.webApplicationType) {
            case SERVLET:
                contextClass = Class.forName(DEFAULT_SERVLET_WEB_CONTEXT_CLASS);
                break;
            case REACTIVE:
                contextClass = Class.forName(DEFAULT_REACTIVE_WEB_CONTEXT_CLASS);
                break;
            default:
                contextClass = Class.forName(DEFAULT_CONTEXT_CLASS);
            }
        }
        catch (ClassNotFoundException ex) {
            throw new IllegalStateException(
                    "Unable create a default ApplicationContext, " + "please specify an ApplicationContextClass",
                    ex);
        }
    }
    return (ConfigurableApplicationContext) BeanUtils.instantiateClass(contextClass);
}
prepareContext:准备容器
private void prepareContext(ConfigurableApplicationContext context, ConfigurableEnvironment environment,
        SpringApplicationRunListeners listeners, ApplicationArguments applicationArguments, Banner printedBanner) {
    // 设置容器环境
    context.setEnvironment(environment);
    postProcessApplicationContext(context);
    // 应用初始化器:for循环调用所有初始化器的initialize方法
    applyInitializers(context);
    // contextPrepared:广播ApplicationContextInitializedEvent事件
    listeners.contextPrepared(context);
    if (this.logStartupInfo) {
        logStartupInfo(context.getParent() == null);
        logStartupProfileInfo(context);
    }
    // Add boot specific singleton beans
    ConfigurableListableBeanFactory beanFactory = context.getBeanFactory();
    beanFactory.registerSingleton("springApplicationArguments", applicationArguments);
    if (printedBanner != null) {
        beanFactory.registerSingleton("springBootBanner", printedBanner);
    }
    if (beanFactory instanceof DefaultListableBeanFactory) {
        ((DefaultListableBeanFactory) beanFactory)
                .setAllowBeanDefinitionOverriding(this.allowBeanDefinitionOverriding);
    }
    // Load the sources
    Set<Object> sources = getAllSources();
    Assert.notEmpty(sources, "Sources must not be empty");
    load(context, sources.toArray(new Object[0]));
    // contextLoaded:广播ApplicationPreparedEvent事件
    listeners.contextLoaded(context);
}
refresh:刷新容器核心方法
在启动过程中不详细分析这部分代码,在之后的系列中会专门分析bean的加载过程。
public void refresh() throws BeansException, IllegalStateException {
    synchronized (this.startupShutdownMonitor) {
        // Prepare this context for refreshing.
        prepareRefresh();
        // Tell the subclass to refresh the internal bean factory.
        ConfigurableListableBeanFactory beanFactory = obtainFreshBeanFactory();
        // Prepare the bean factory for use in this context.
        prepareBeanFactory(beanFactory);
        try {
            // Allows post-processing of the bean factory in context subclasses.
            postProcessBeanFactory(beanFactory);
            // Invoke factory processors registered as beans in the context.
            invokeBeanFactoryPostProcessors(beanFactory);
            // Register bean processors that intercept bean creation.
            registerBeanPostProcessors(beanFactory);
            // Initialize message source for this context.
            initMessageSource();
            // Initialize event multicaster for this context.
            initApplicationEventMulticaster();
            // Initialize other special beans in specific context subclasses.
            onRefresh();
            // Check for listener beans and register them.
            registerListeners();
            // Instantiate all remaining (non-lazy-init) singletons.
            // 完成bean的实例化,包括开发人员在项目中自定义的bean
            finishBeanFactoryInitialization(beanFactory);
            // Last step: publish corresponding event.
            finishRefresh();
        }
        catch (BeansException ex) {
            if (logger.isWarnEnabled()) {
                logger.warn("Exception encountered during context initialization - " +
                        "cancelling refresh attempt: " + ex);
            }
            // Destroy already created singletons to avoid dangling resources.
            destroyBeans();
            // Reset 'active' flag.
            cancelRefresh(ex);
            // Propagate exception to caller.
            throw ex;
        }
        finally {
            // Reset common introspection caches in Spring's core, since we
            // might not ever need metadata for singleton beans anymore...
            resetCommonCaches();
        }
    }
}
总结
Spring Boot项目的启动入口是项目启动类的main方法。通过main方法中的SpringApplication.run(SpringbootAnalyzeApplication.class, args);,Spring Boot项目实例化了一个SpringApplication对象,然后调用了这个对象的实例方法run()完成项目的启动。
因此对于项目的启动过程大致可以分为两块:
- 新建SpringApplication对象,执行构造方法里的语句。
- 执行SpringApplication对象的run实例方法。
执行SpringApplication的构造方法
- 判断应用程序的类型(reactive/servlet/none)
- 设置初始化器(初始化器用于应用程序的初始化)
- 设置监听器(监听器用于监听容器构建过程中发布的事件)
- 设置应用程序的主类
执行SpringApplication的run方法
应用程序开始准备:发布ApplicationStartingEvent事件
环境配置:
获取或根据应用程序类型创建默认环境。
发布ApplicationEnvironmentPreparedEvent事件。
创建容器:根据应用程序类型创建默认容器
准备容器:
设置容器环境
应用初始化器
发布ApplicationContextInitializedEvent事件
设置容器的beanFactory和source
发布ApplicationPreparedEvent事件
刷新容器:
- 加载所有预置及自定义的bean,实例化bean的单例,等等
- 发布ContextRefreshedEvent事件
- 发布ServletWebServerInitializedEvent事件
应用程序准备完成:发布ApplicationReadyEvent事件
Spring Boot项目启动过程中,Bean单例的实例化等等操作是在刷新容器中做的,为了保证文章的可读性,作者将这部分从启动过程中剥离,将单独作为一章来分析。
附录
初始化器接口:包含
void initialize(C applicationContext)方法public interface ApplicationContextInitializer<C extends ConfigurableApplicationContext> { /** * Initialize the given application context. * @param applicationContext the application to configure */ void initialize(C applicationContext); }监听器接口:包含
void onApplicationEvent(E event)方法SpringApplicationRunListeners发布的事件最终会调用到对应监听器的onApplicationEvent方法
@FunctionalInterface
public interface ApplicationListener<E extends ApplicationEvent> extends EventListener {

    /**
     * Handle an application event.
     * @param event the event to respond to
     */
    void onApplicationEvent(E event);

}
EventPublishingRunListener类:监控run方法的执行
public class EventPublishingRunListener implements SpringApplicationRunListener, Ordered {

    private final SpringApplication application;

    private final String[] args;

    private final SimpleApplicationEventMulticaster initialMulticaster;

    public EventPublishingRunListener(SpringApplication application, String[] args) {
        this.application = application;
        this.args = args;
        this.initialMulticaster = new SimpleApplicationEventMulticaster();
        for (ApplicationListener<?> listener : application.getListeners()) {
            this.initialMulticaster.addApplicationListener(listener);
        }
    }

    @Override
    public int getOrder() {
        return 0;
    }

    @Override
    public void starting() {
        this.initialMulticaster.multicastEvent(new ApplicationStartingEvent(this.application, this.args));
    }

    @Override
    public void environmentPrepared(ConfigurableEnvironment environment) {
        this.initialMulticaster
                .multicastEvent(new ApplicationEnvironmentPreparedEvent(this.application, this.args, environment));
    }

    @Override
    public void contextPrepared(ConfigurableApplicationContext context) {
        this.initialMulticaster
                .multicastEvent(new ApplicationContextInitializedEvent(this.application, this.args, context));
    }

    @Override
    public void contextLoaded(ConfigurableApplicationContext context) {
        for (ApplicationListener<?> listener : this.application.getListeners()) {
            if (listener instanceof ApplicationContextAware) {
                ((ApplicationContextAware) listener).setApplicationContext(context);
            }
            context.addApplicationListener(listener);
        }
        this.initialMulticaster.multicastEvent(new ApplicationPreparedEvent(this.application, this.args, context));
    }

    @Override
    public void started(ConfigurableApplicationContext context) {
        context.publishEvent(new ApplicationStartedEvent(this.application, this.args, context));
    }

    @Override
    public void running(ConfigurableApplicationContext context) {
        context.publishEvent(new ApplicationReadyEvent(this.application, this.args, context));
    }

    @Override
    public void failed(ConfigurableApplicationContext context, Throwable exception) {
        ApplicationFailedEvent event = new ApplicationFailedEvent(this.application, this.args, context, exception);
        if (context != null && context.isActive()) {
            // Listeners have been registered to the application context so we should
            // use it at this point if we can
            context.publishEvent(event);
        }
        else {
            // An inactive context may not have a multicaster so we use our multicaster to
            // call all of the context's listeners instead
            if (context instanceof AbstractApplicationContext) {
                for (ApplicationListener<?> listener : ((AbstractApplicationContext) context)
                        .getApplicationListeners()) {
                    this.initialMulticaster.addApplicationListener(listener);
                }
            }
            this.initialMulticaster.setErrorHandler(new LoggingErrorHandler());
            this.initialMulticaster.multicastEvent(event);
        }
    }

    private static class LoggingErrorHandler implements ErrorHandler {

        private static Log logger = LogFactory.getLog(EventPublishingRunListener.class);

        @Override
        public void handleError(Throwable throwable) {
            logger.warn("Error calling ApplicationEventListener", throwable);
        }

    }

}
转载请注明来源,欢迎对文章中的引用来源进行考证,欢迎指出任何有错误或不够清晰的表达。可以在下面评论区评论,也可以邮件至 504537531@qq.com
文章标题:SpringBoot源码分析之启动过程[1]
文章字数:2.2k
本文作者:YF
发布时间:2019-09-23, 16:23:14
最后更新:2019-10-15, 17:08:30
原始链接:https://zhouyufan0568.github.io/2019/09/23/springboot-startup-analysis/版权声明: "署名-非商用-相同方式共享 4.0" 转载请保留原文链接及作者。